Part 9: Hello Seqera
So far we've been running Nextflow workflows on our local machine using the command line interface. In this section, we'll introduce you to Seqera Platform, a powerful cloud-based platform for running, monitoring, and sharing Nextflow workflows.
Tip
Sign up to try Seqera for free or request a demo for deployments in your own on-premise or cloud environment.
You'll learn how to use Seqera Platform within Nextflow CLI command-line interface, the Seqera Platform GUI (Graphical User Interface), and the Seqera API (Application Program Interface).
1. Use Seqera Platform to capture and monitor Nextflow jobs launched from the CLI
We'll start by using the Nextflow CLI to launch a pipeline and monitor it in Seqera Platform. Start by logging into the Seqera Platform.
Nextflow Tower
Seqera Platform was previously known as Nextflow Tower. You'll still see references to the previous name in environment variable and cli option names.
1.1. Set up your Seqera Platform token by exporting it to your environment
Follow these steps to set up your token:
-
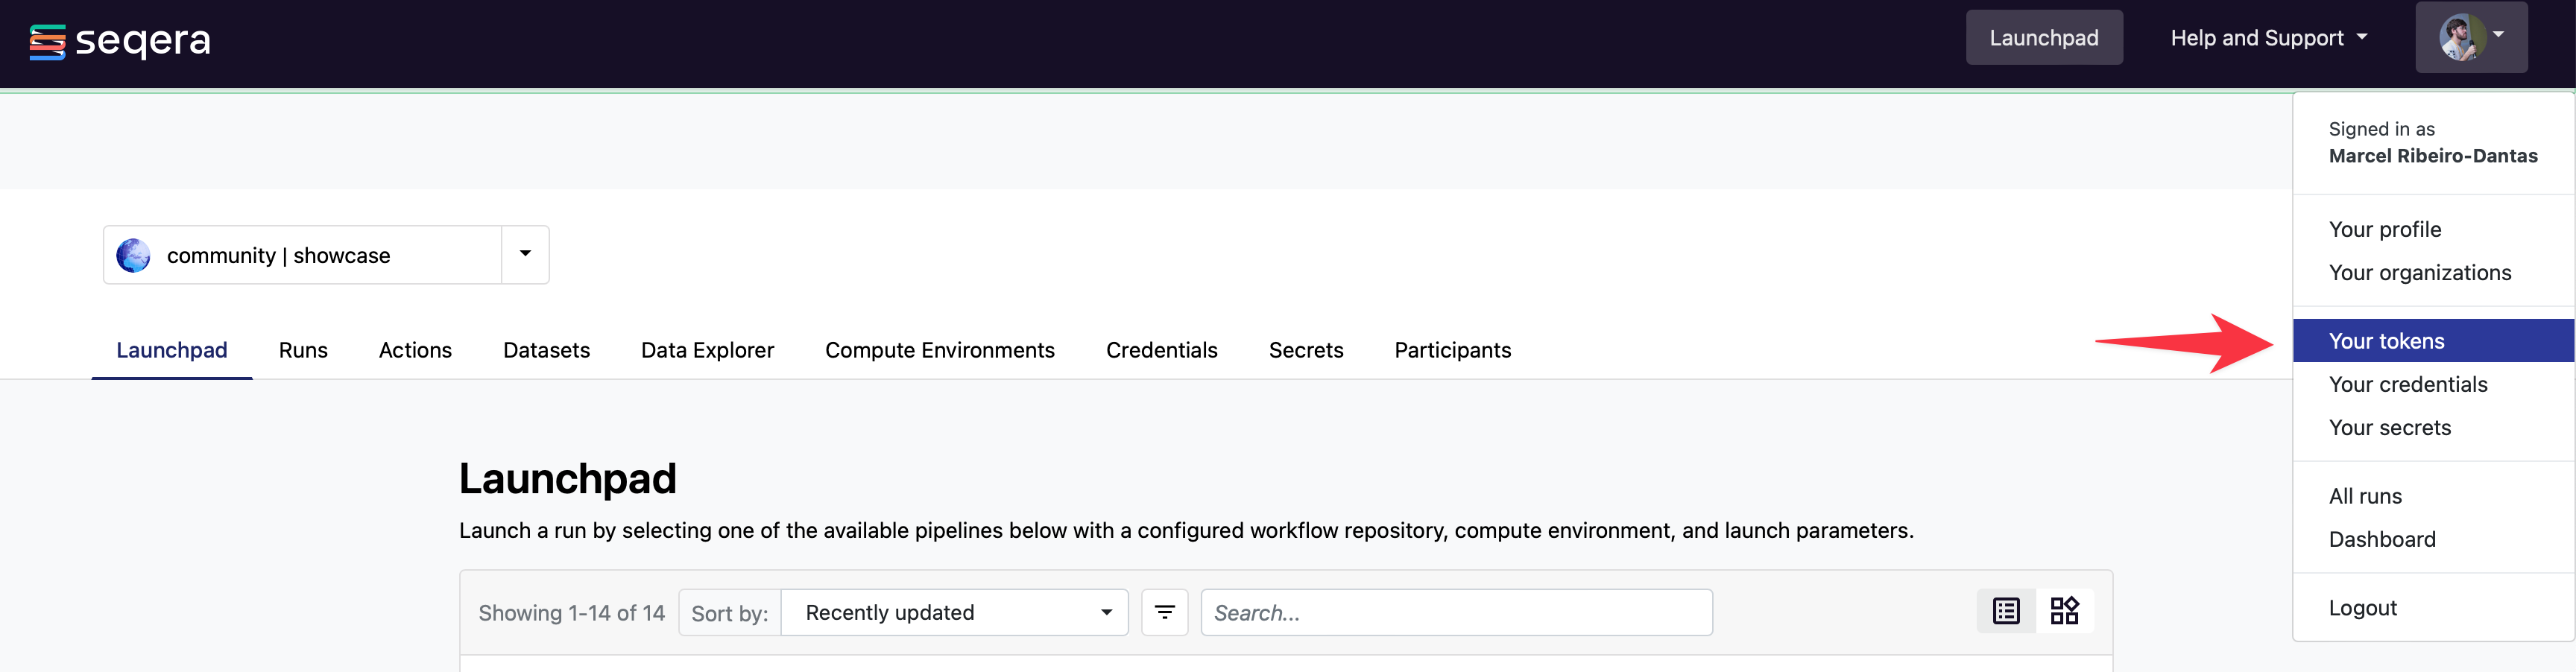
Create a new token by clicking on the Settings drop-down menu:
-
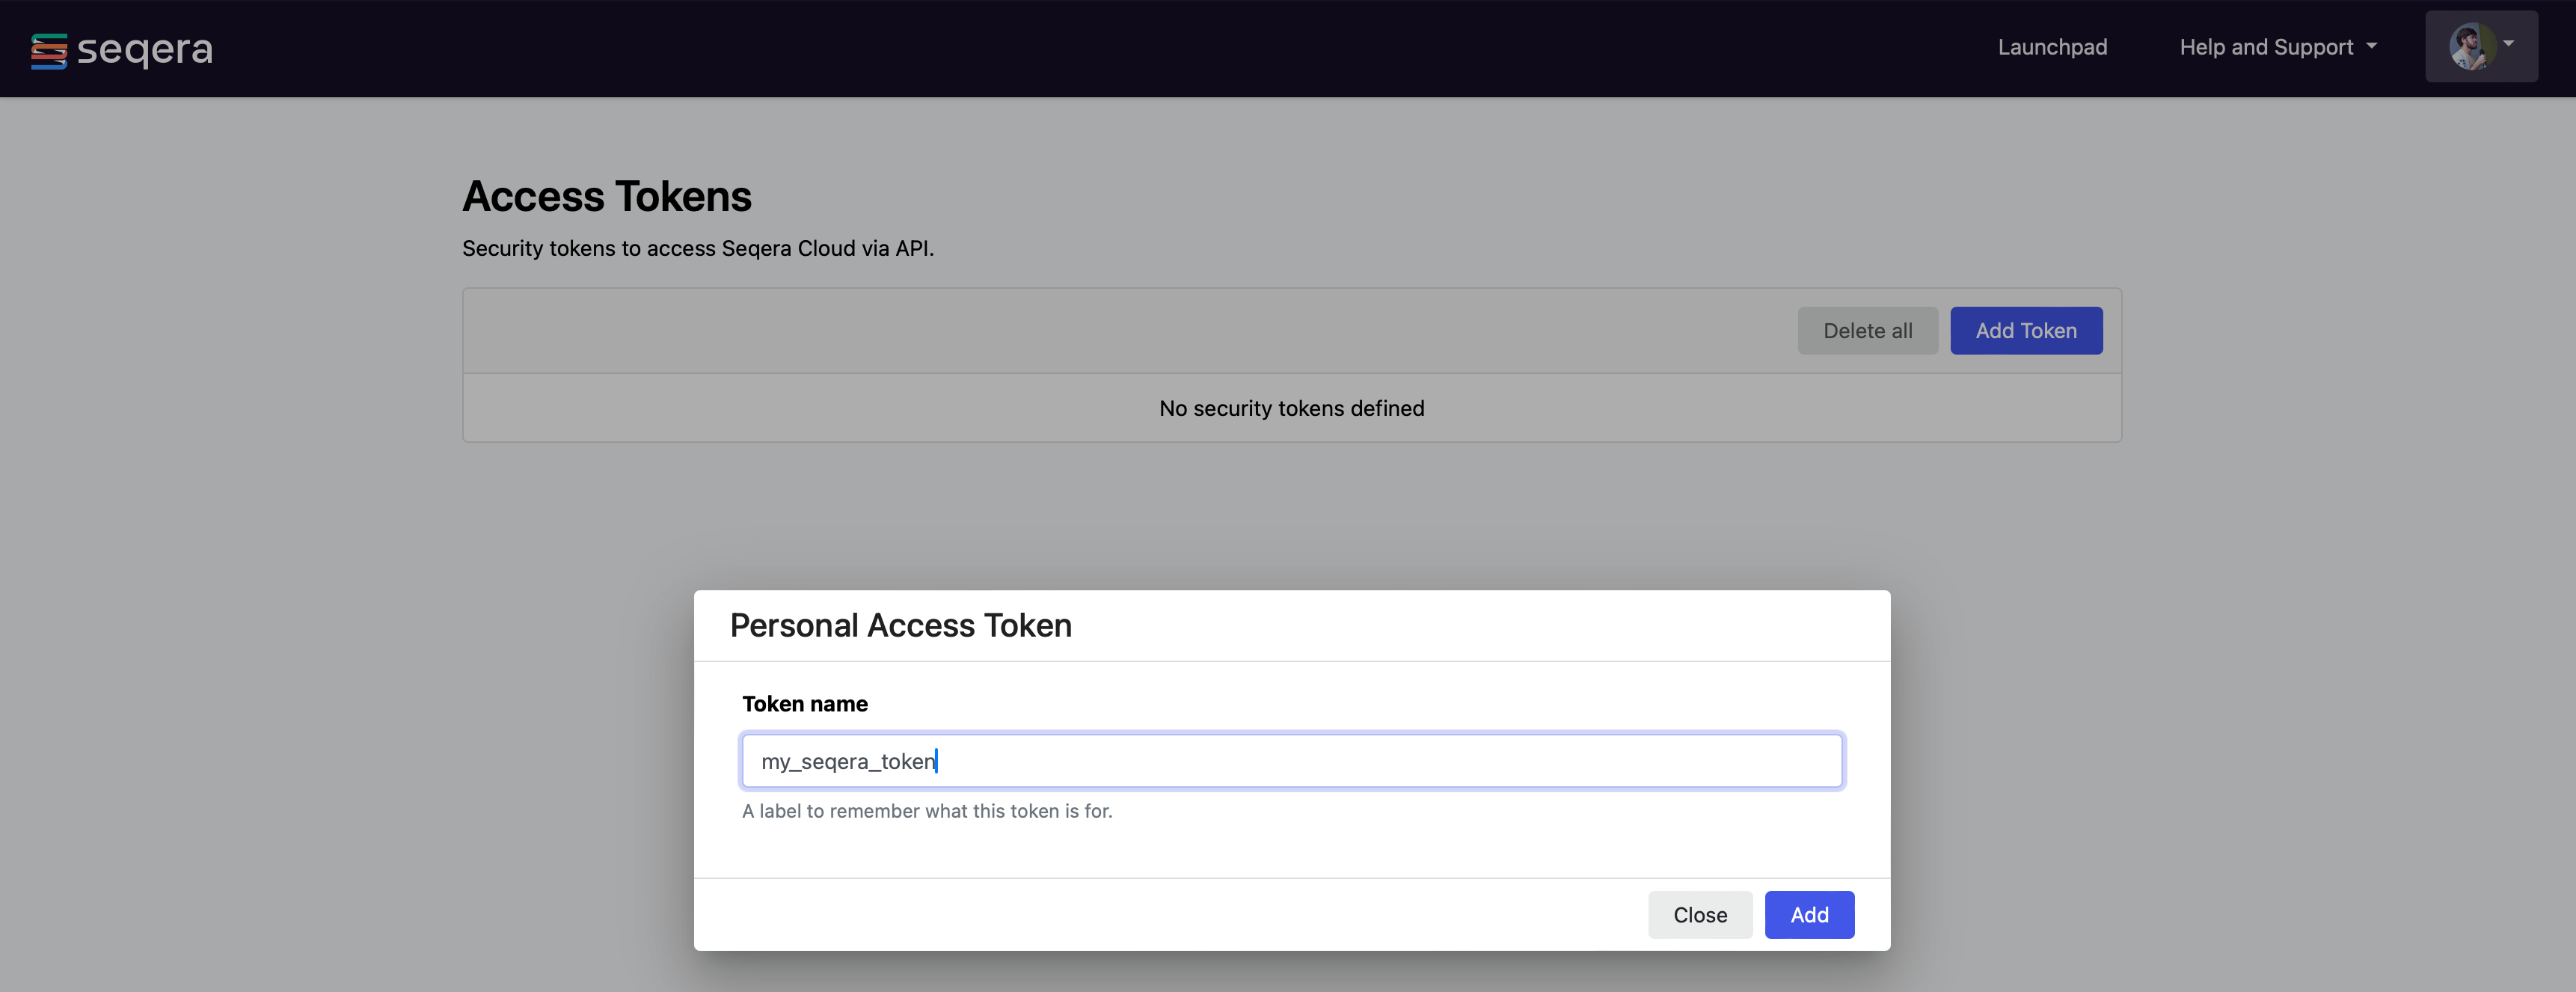
Name your token:
-
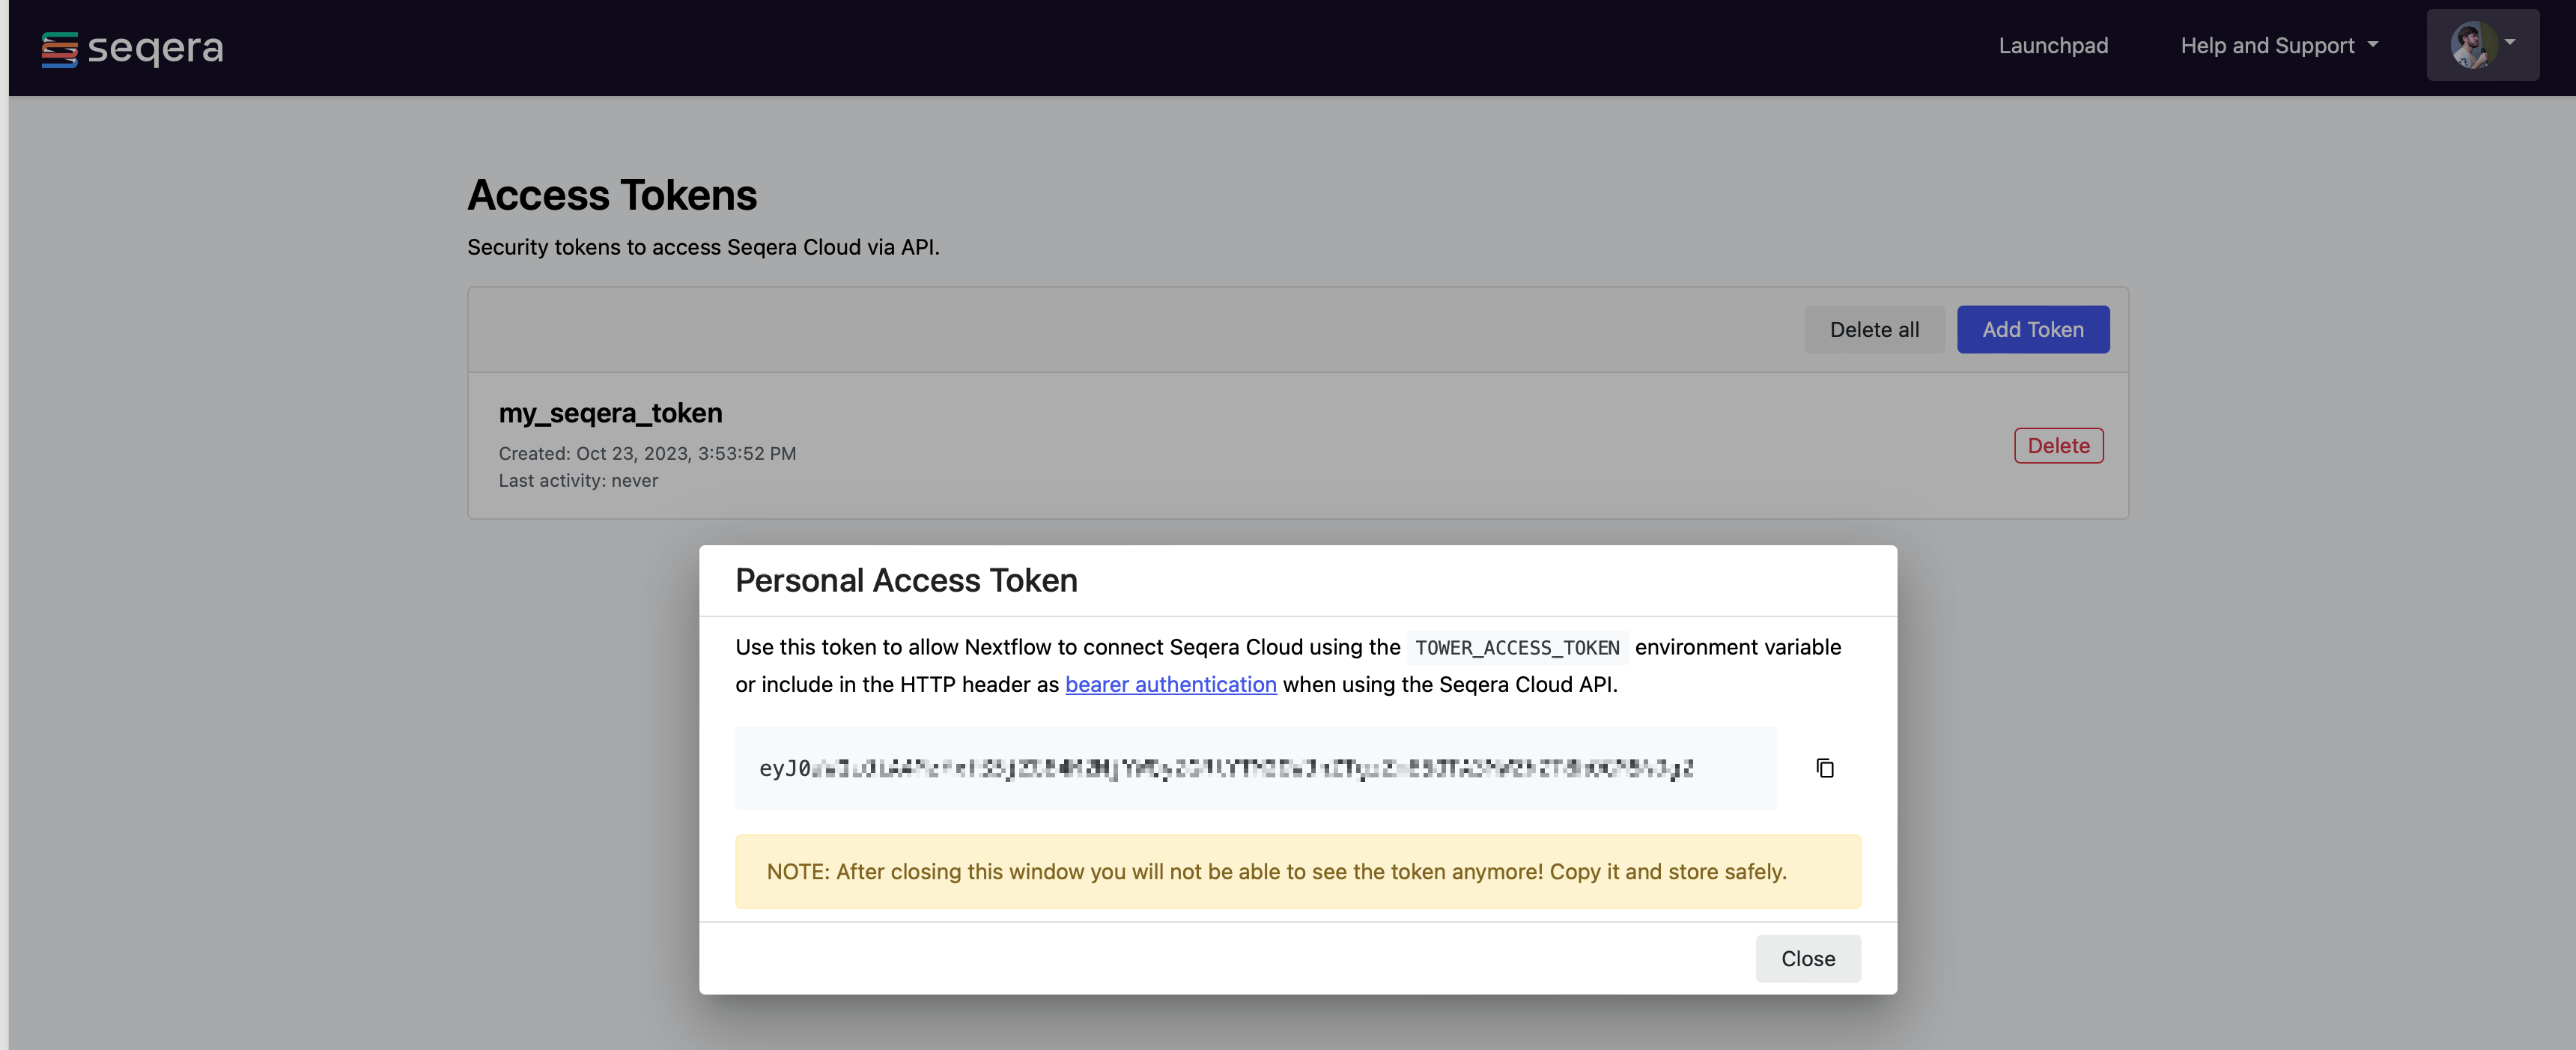
Save your token safely:
Note
Leave this browser tab open as we will need the token once more to store it as a Nextflow secret.
-
To make your token available to the Nextflow CLI, export it on the command line:
Open a terminal and type:
Where
eyxxxxxxxxxxxxxxxQ1ZTE=is the token you have just created.
1.2. Run Nextflow cli with Seqera Platform visualizing and capturing logs
Run your Nextflow workflows as usual with the addition of the -with-tower command:
You will see output similar to the following:
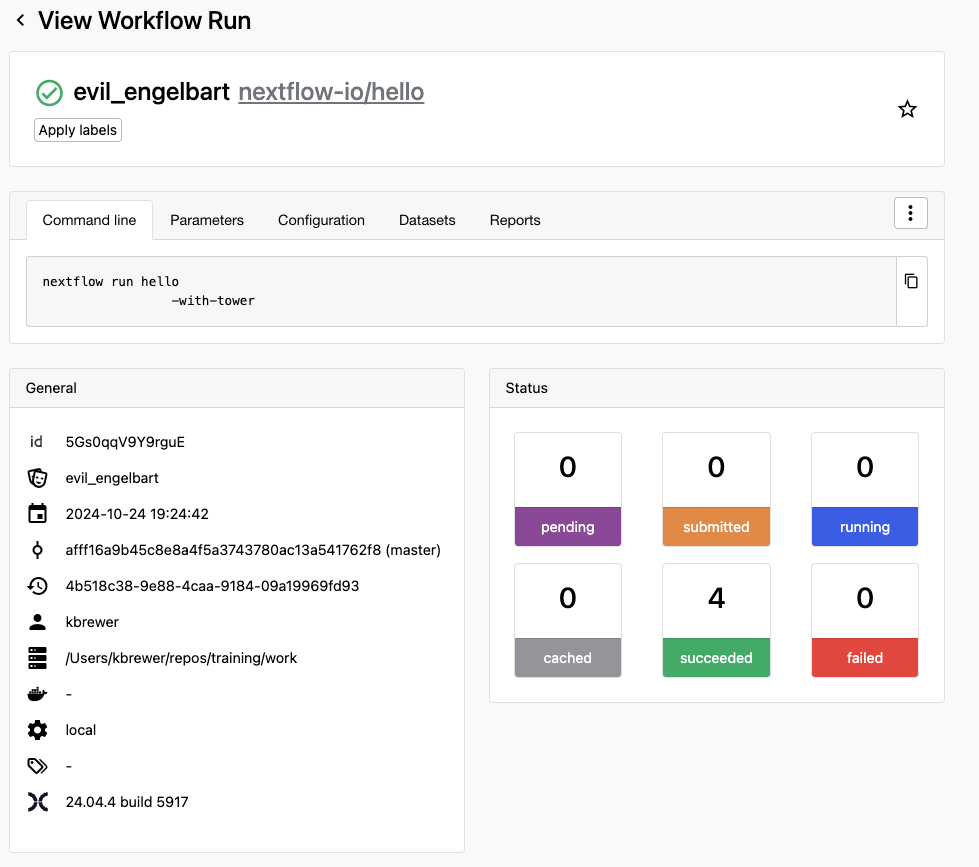
 N E X T F L O W   ~  version 24.04.4

Launching `https://github.com/nextflow-io/hello` [evil_engelbart] DSL2 - revision: afff16a9b4 [master]

Downloading plugin nf-tower@1.9.1
Monitor the execution with Seqera Platform using this URL: https://cloud.seqera.io/user/kenbrewer/watch/5Gs0qqV9Y9rguE
executor >  local (4)
[80/810411] process > sayHello (1) [100%] 4 of 4 ✔
Ciao world!

Bonjour world!

Hola world!

Hello world!
Use ++ctrl+click++ or ++cmd+click++ on the link to open it in your browser. You'll see the Seqera Platform interface with the job finished and the logs captured.
You will see and be able to monitor your Nextflow jobs in Seqera Platform.
1.3. Set up Seqera Platform in Nextflow configuration
Doing that token setup regularly can get bit tedious, but the same setup can be applied in configuration applied to Nexflow configuration so that it does not need to be set each time.
This can be the nextflow.config file of a specific project, or the global file located at $HOME/.nextflow/config, which will apply to all your runs.
Before we set the configuration, we need to permanently store the token in Nextflow using a Nextflow secret:
We want to configure Nextflow to use Seqera Platform by default across all our pipelines, so we will open the global Nextflow configuration file ($HOME/.nextflow/config) for editing:
Add the following configuration to the file:
tower {
    enabled = true
    accessToken = secrets.tower_access_token
    workspaceId = secrets.tower_workspace_id
    endpoint = "https://api.cloud.seqera.io"
}
!!! hint "Workspace ID and Endpoint`
We haven't set `secrets.tower_workspace_id` yet, and so Nextflow will fill in an empty string for this value.
This will default to the user's workspace in Seqera Platform which is what we want for now.

The `endpoint` is the URL of the Seqera Platform API.
If your institution is running a private instance of Seqera Platform, you will want to change this to the appropriate URL.
Run your Nextflow workflows as usual:
You will see the following output:
 N E X T F L O W   ~  version 24.04.4

Launching `https://github.com/nextflow-io/hello` [fabulous_euclid] DSL2 - revision: afff16a9b4 [master]

Monitor the execution with Seqera Platform using this URL: https://cloud.seqera.io/user/kenbrewer/watch/KYjRktIlOuxrh
executor >  local (4)
[71/eaa915] process > sayHello (3) [100%] 4 of 4 ✔
Ciao world!

Bonjour world!

Hola world!

Hello world!
Note that we are logging to Seqera Platform even though we did not use the -with-tower command!
1.4. Use Seqera Platform to explore the resolved configuration of a Nextflow pipeline
Click on the link provided in the output to open the Seqera Platform for your run, then click on the Configuration tab.
If you ran your pipeline from the hello_nextflow directory, you'll see something like this:
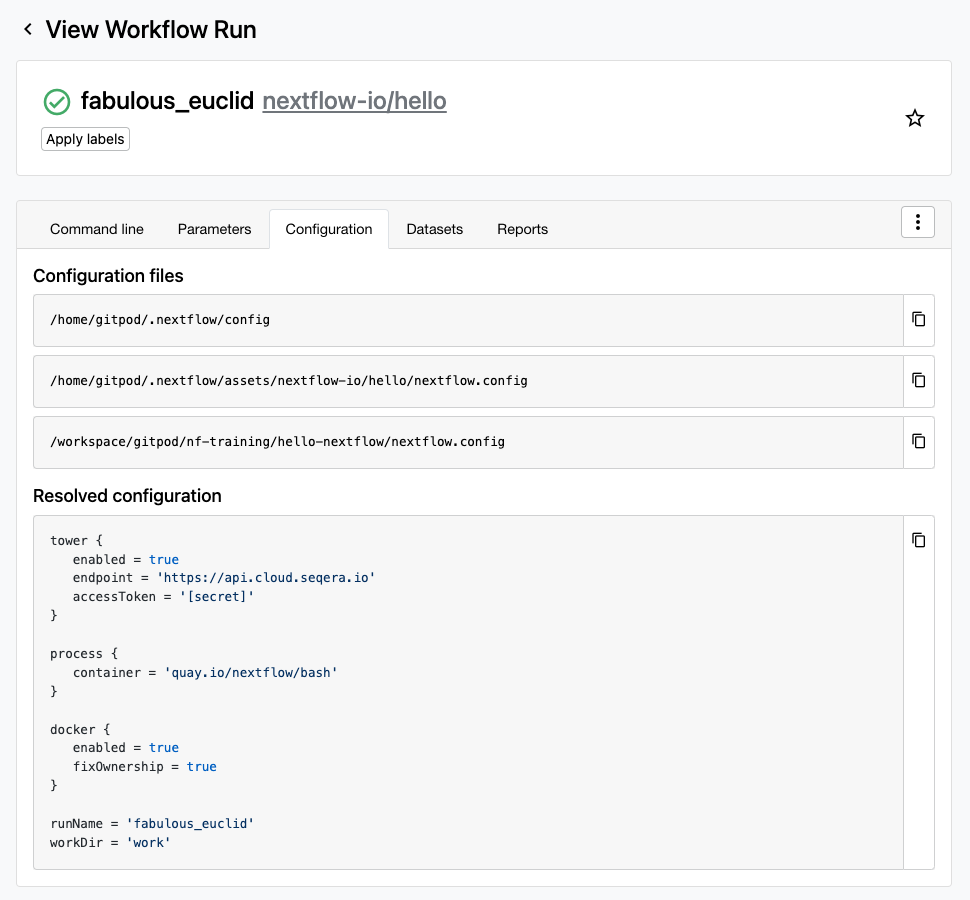
Notice that configuration for our pipeline run is being run pulled from three separate files:
/home/gitpod/.nextflow/config- This is the global configuration file we just added./home/gitpod/.nextflow/assets/nextflow-io/hello/nextflow.config- This is thenextflow.configfile from thenextflow-io/hellorepository./workspace/gitpod/nf-training/hello-nextflow/nextflow.config- This is thenextflow.configfile from our current working directory.
Nextflow resolves these configurations at runtime with a specific order of precedence. The general rule, however, is that more specific configurations override less specific ones, and config/params specified on the CLI will override defaults in the config files.
Helpfully, Seqera Platform shows us the final output of this configuration resolution process which can be very useful for debugging!
Takeaway
You have learned how to:
- Set up your Seqera Platform token by exporting it to your environment.
- Run Nextflow CLI with Seqera Platform visualizing and capturing logs.
- Set up Seqera Platform logging by default.
- Use Seqera Platform to explore the resolved configuration of a Nextflow pipeline.
What's next?
Learn how to launch Nextflow pipelines from Seqera Platform using the Launchpad feature.
2 Using Seqera Platform Launchpad to run Nextflow workflows
So far we've been running Nextflow workflows on our local machine using the command line interface but sending the logs to Seqera Platform for monitoring and visualization. Next we want to start using Seqera Platform to launch Nextflow workflows on our behalf.
Community Showcase
Having a compute environment capable of running Nextflow workflows configured in Seqera Platform is normally a prerequisite for this task. But we want to see how it works before we put in that effort, so we'll start by launching a job in community/showcase workspace which has a compute environment already set up.
Trainer Tip
Launch a test run of the nf-core/rnaseq pipeline in the community/showcase workspace prior to starting this session, so you'll have a recent run for participants to inspect.
2.1. Navigate to the community/showcase workspace
Seqera Platform has a concept of organizations and workspaces which are used to organize and share pipelines, compute environments, data, credentials, and more.
The community/showcase workspace is a public workspace where you can see some example pipelines and compute environments.
Each user has an alloted amount of free compute to use in this workspace.
Click on your username in the top left corner of the screen to bring up the list of organizations and workspaces you have access to.
Select the community/showcase workspace.
2.2. Launch a test run of nf-core/rnaseq pipeline
In the community/showcase workspace, you will see a list of pipelines that have been set up by the workspace owner for you to run.
Follow these steps to launch a test run of a pipeline:

- Find the
nf-core-rnaseqpipeline in the list of pipelines. - Click on the
Launchbutton to bring up the launch form. - Change the "Workflow run name" to "
-rnaseq-test". - Click "Next" to bring up the parameters form.
- Find the
trimmerparameter and change it tofastp. - Click to "Next" to inspect the advanced configuration.
- Click "Launch" to start the pipeline!
Tip
In the advanced configuration, you'll see a section named "Pre-run script" with a script similar to the following:
This is what ensures that everyone's pipeline will write to a unique location in cloud storage despite all having the outdir parameter set to ./results.
2.3. Monitor the pipeline run
After launching the pipeline, you will be taken to the pipeline run page where you can monitor the progress of the pipeline. It may take some time for the pipeline to start running while AWS Batch spins up the needed resources, so go to the "Runs" tab above the pipeline and open a recent completed (or failed) run by one of your "teammates" in the community.
2.4. Inspect a pipeline run
Scroll down to find the list of tasks that were executed in the pipeline run.
For example, by searching for fastq we can find the task NFCORE_RNASEQ:RNASEQ:FASTQ_FASTQC_UMITOOLS_FASTP:FASTP (WT_REP2) that was executed as part of the pipeline.
Click on the task to see the task details:
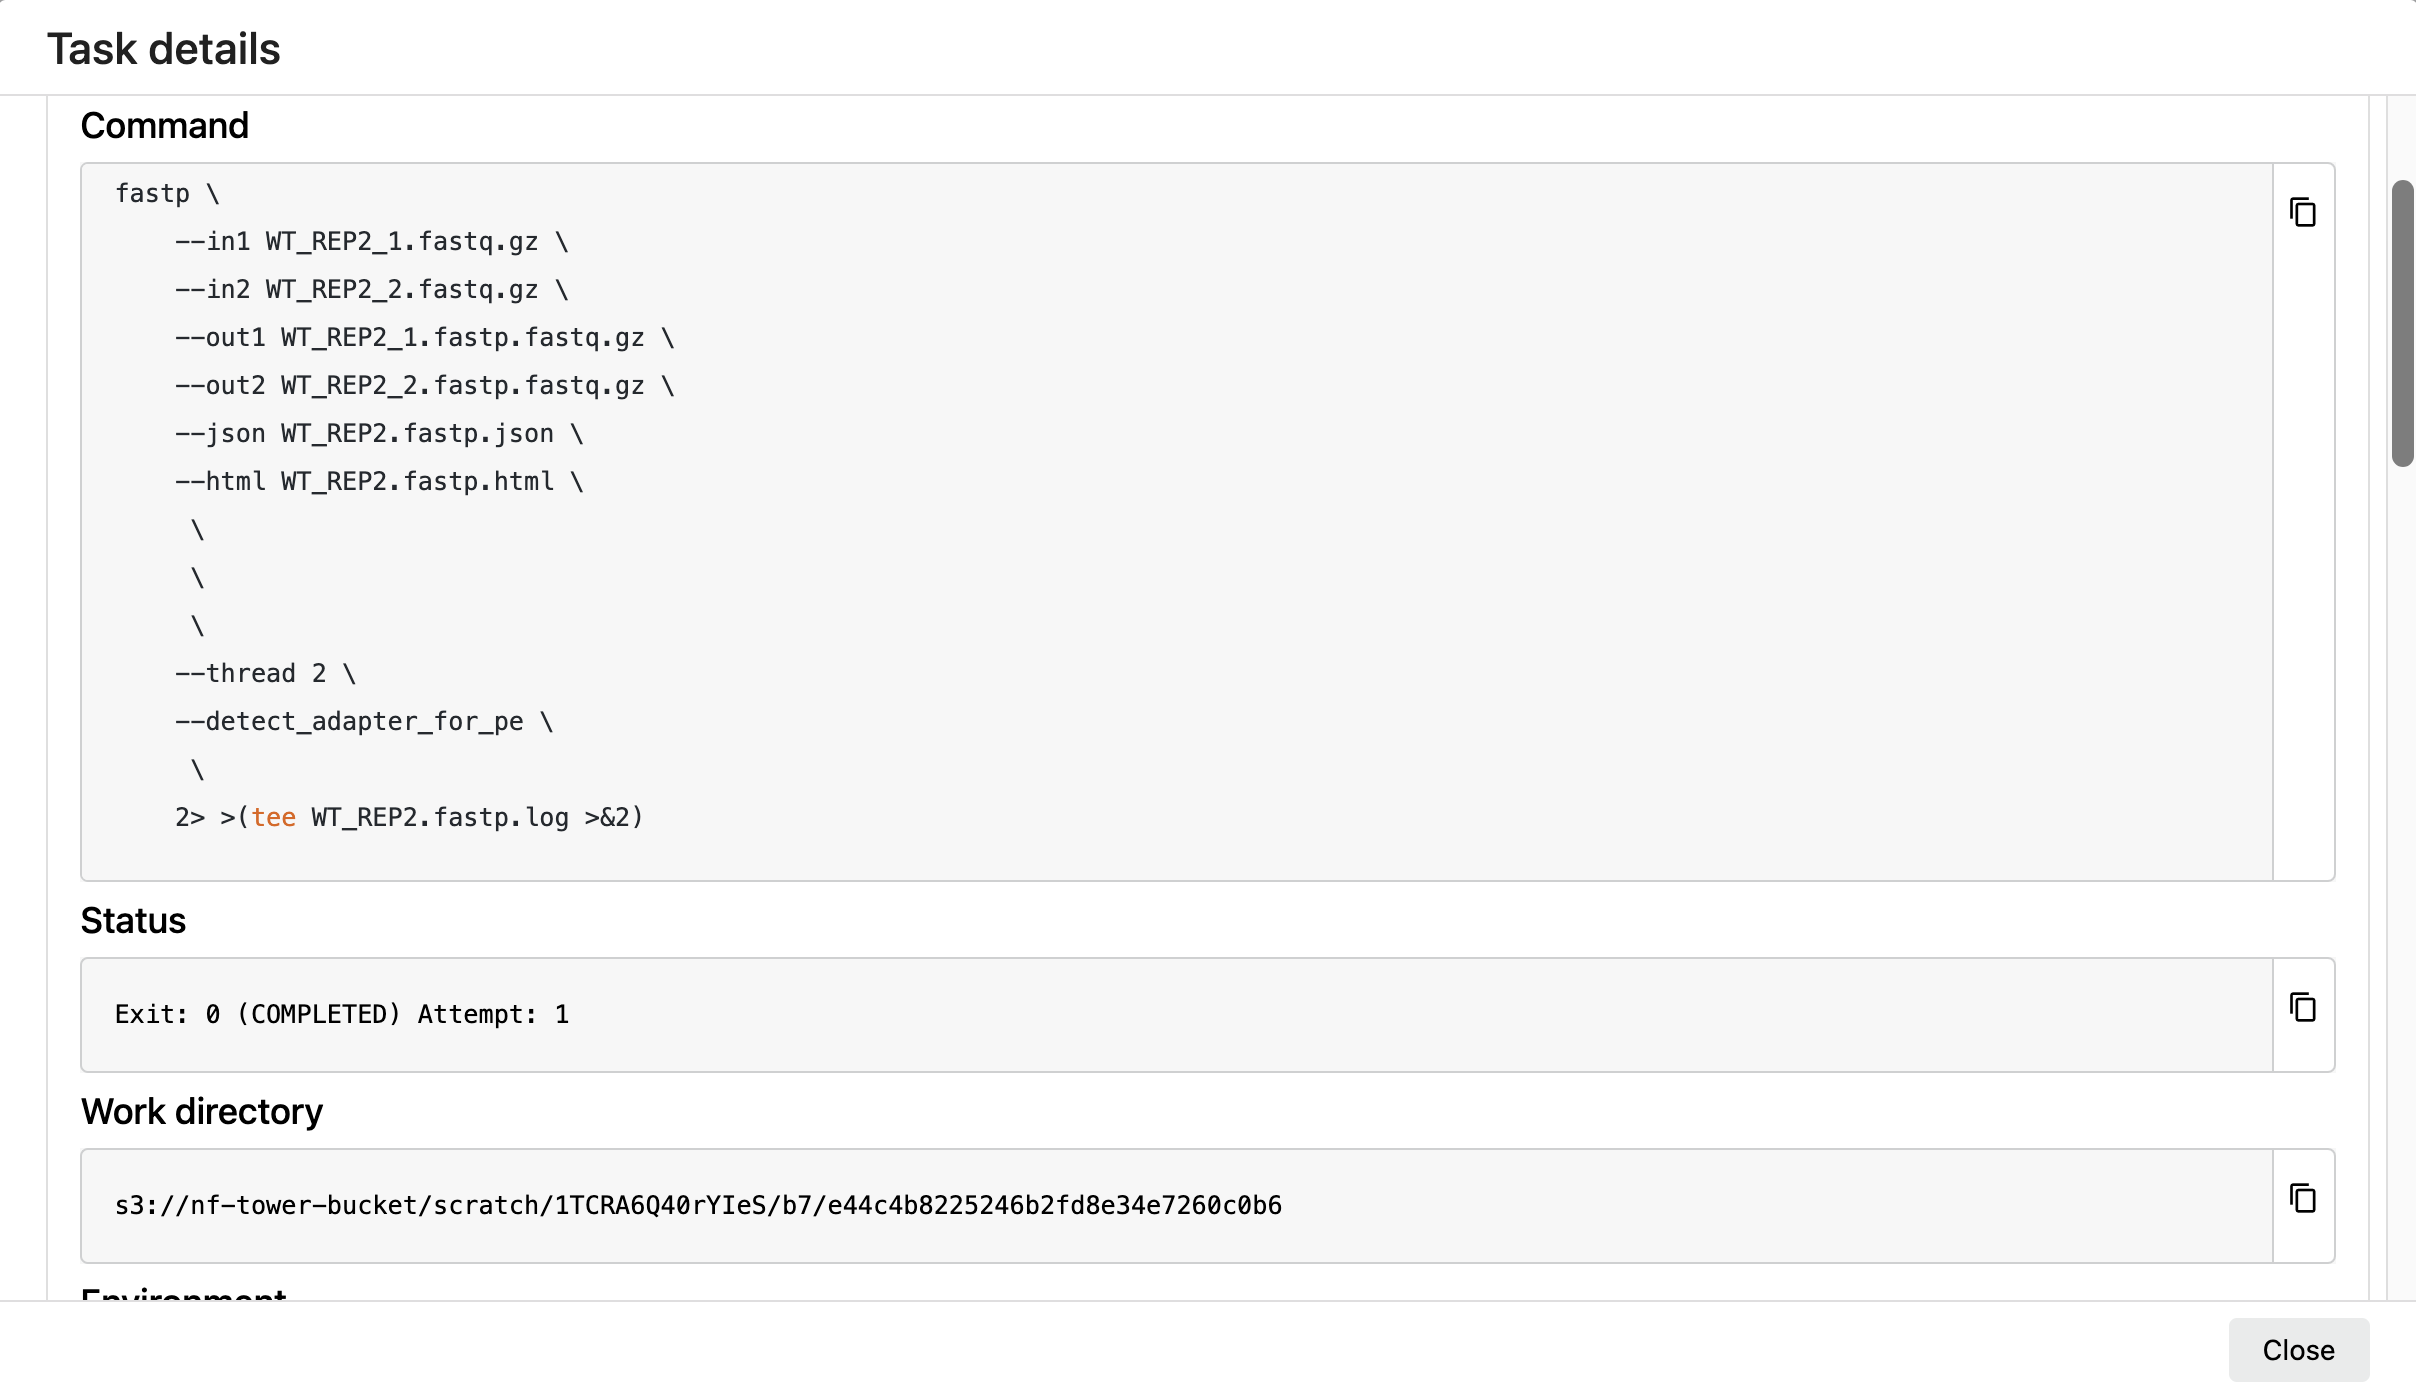
-
Find the following details on the "About" page for the the task you're inspecting:
- How long did the task script run (not including scheduling time)?
- How many CPUs were allocated to the task?
- What was the virtual machine type that the task ran on?
- What was the estimated cost of the task?
-
Explore the Execution Log tab. What information is available here?
-
Explore the Data Explorer tab. Note that the work directory structure we've seen during local runs is replicated here in cloud storage!
Takeaway
You have learned how to:
- Switch between organizations and workspaces in Seqera Platform.
- Launch a Nextflow pipeline that ran in the cloud using Seqera Platform.
- Monitor the progress of the pipeline run.
- Inspect the details of a task that was executed as part of the pipeline.
Next steps
In the next section, we will learn how to set up a compute environment in Seqera Platform to run our own Nextflow workflows.
3. Add a compute environment
In this section, we will simulate setting up a new compute environment to run our pipeline in Seqera Platform Launchpad. Seqera Platform uses the concept of Compute Environments to define the execution platform where a workflow will run. It supports the launching of workflows into a growing number of cloud and on-premise infrastructures.
Each compute environment must be pre-configured to enable Seqera Platform to submit tasks. You can read more on how to set up each environment using the links below.
The following guides describe how to configure each of these compute environments.
To practice this process, we will simulate setting up a new slurm compute environment on our gitpod using Tower Agent.
3.1. Setup Tower Agent
Most Seqera compute environments require provisioning a credential that grants access to those compute resources. In this case, we will use Tower Agent , a lightweight program that can be installed on any machine to enable Seqera Platform to run Nextflow workflows on your behalf.
Follow these instructions to configure your Tower Agent.
1. Create a new Token named "GitpodAgentToken" on the tokens page, following previous instructions.
1. Export your token into your current terminal:

    ```bash
     export TOWER_ACCESS_TOKEN=<your-token>
    ```

1. Within Seqera Platform, click on your workspace name on the top left, and change back to your personal user workspace.
1. Click on the "Credentials" tab
1. Add the name "gitpodTowerAgent" to the name field
1. Select "Tower Agent" from the list of providers.
1. Copy the "Agent Connection ID" shown in the dropdown, it should look similar to `75d74f5f-9454-48b6-8967-cf20b74f6c78`
1. In your terminal execute the command below replacing with your connection ID:

    ```bash
    tw-agent 75d74f5f-9454-48b6-8967-cf20b74f6c78 --work-dir=./work
    ```

1. Return to Seqera Platform and click on the "Add" button.
If you completed this successfully, you'll see "gitpodTowerAgent" in the list of credentials in Seqera Platform, and console output in your terminal similar to what's below:
21:47:33.531 INFO - Established active environments: [cli]
21:47:33.662 INFO - TOWER AGENT v0.5.0
21:47:33.662 INFO - Compatible with TOWER API v1.8
21:47:33.662 INFO - Connecting as user 'gitpod' with default work directory '/workspaces/training/work'
21:47:34.565 INFO - Connecting to Tower
21:47:34.801 INFO - Connection to Tower established
21:48:18.674 INFO - Sending heartbeat
21:48:18.755 INFO - Received heartbeat
21:49:03.680 INFO - Sending heartbeat
21:49:03.741 INFO - Received heartbeat
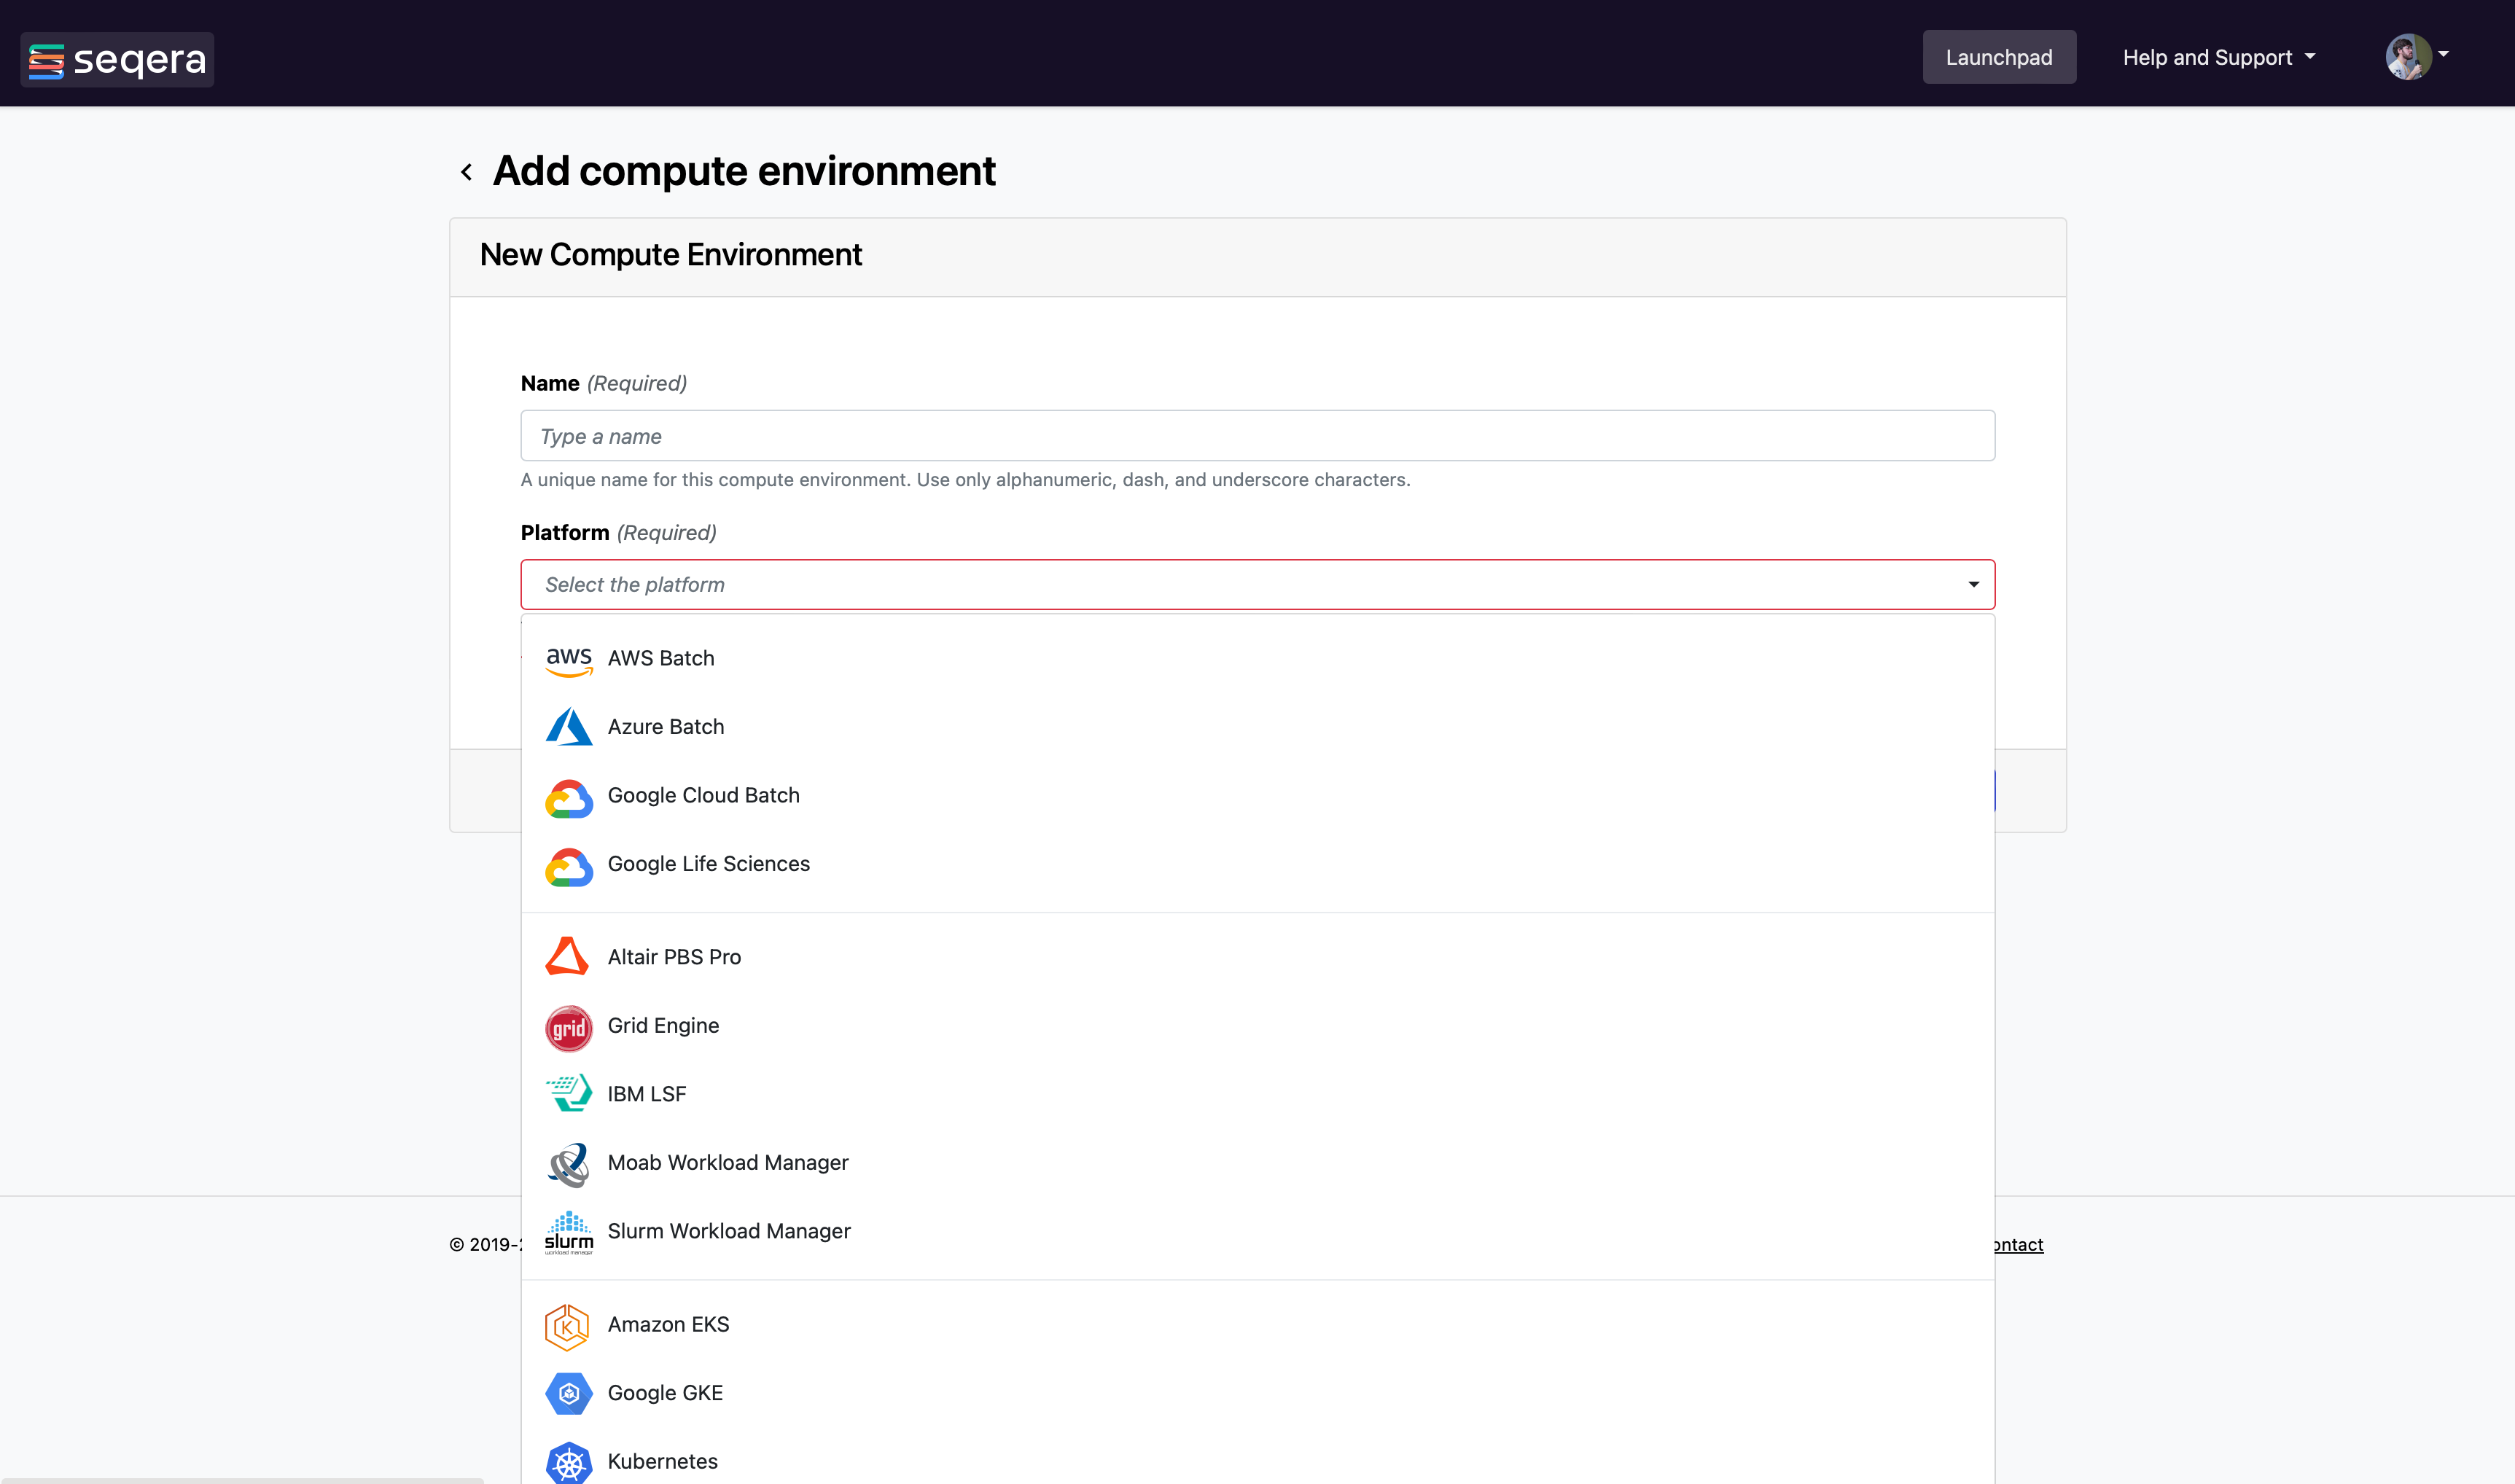
3.2. Add a simulated Grid Engine compute environment to Seqera Plaform.
Now that we have set up a credential granting us secure access to our computational resources, we will set up a Compute Environment in Seqera which is a set of configuration that allows us to launch nextflow pipelines. Follow the steps below:
1. Navigate to the Compute Environments tab of Seqera Platform.
1. Click "Add compute environment"
1. Name your compute environment `gitpodGridEngine`.
1. Select "Grid Engine" as the target execution platform.
1. Make sure "gitpodTowerAgent" is selected from the list of credentials.
1. Click "Add"
3.3. Add a pipeline to the launchpad for execution on our "Compute Environment"
Now we need to set up a pipeline in Seqera Platform to run on our simulated Grid Engine compute environment.
Follow the steps below:
1. Click on the "Launchpad" tab of Seqera Platform.
1. On the top right click on "Add Pipeline".
1. For name enter `hello-grid-engine`
1. For the Compute Environment select `gitpodGridEngine`
1. For the "Pipeline to launch" enter `nextflow-io/hello`.
1. Finally click "Add"
You now should see "hello-grid-engine` in the list of pipelines.
3.4. Launch your Nextflow pipeline
To create that:
4. Setup a new pipeline to run in Seqera Platform Launchpad
In this section, we will set up a new pipeline to run in Seqera Platform Launchpad.
4.1. Add your Github credentials to your personal workspace in Seqera Platform
4.2. Add the pipeline seqeralabs/nf-hello-gatk to your launchpad
4.3. Change the branch of the pipeline to nextflow_schema
4.4. Unsuccessfully launch a pipeline on our Tower Agent
Warning
Everything below this note is content that was copied from the original guide and needs to be moved or rewritten into the above sub-pages.
Online GUI
To run using the GUI, there are three main steps:
- Create an account and login into Seqera Platform, available free of charge, at cloud.seqera.io.
- Create and configure a new compute environment.
- Start launching pipelines.
Selecting a default compute environment
If you have more than one Compute Environment, you can select which one will be used by default when launching a pipeline.
- Navigate to your compute environments.
- Choose your default environment by selecting the Make primary button.
Congratulations!
You are now ready to launch workflows with your primary compute environment.
Launchpad
Launchpad makes it easy for any workspace user to launch a pre-configured pipeline.

A pipeline is a repository containing a Nextflow workflow, a compute environment and workflow parameters.
Pipeline Parameters Form
Launchpad automatically detects the presence of a nextflow_schema.json in the root of the repository and dynamically creates a form where users can easily update the parameters.
Info
The parameter forms view will appear if the pipeline has a Nextflow schema file for the parameters. Please refer to the Nextflow Schema guide to learn more about the schema file use-cases and how to create them.
This makes it trivial for users without any expertise in Nextflow to enter their workflow parameters and launch.

Adding a new pipeline
Adding a pipeline to the pre-saved workspace launchpad is detailed in full on the Seqera webpage docs.
In brief, these are the steps you need to follow to set up a pipeline.
- Select the Launchpad button in the navigation bar. This will open the Launch Form.
- Select a compute environment.
- Enter the repository of the workflow you want to launch. e.g. https://github.com/nf-core/rnaseq.git
- Select a workflow Revision number. The Git default branch (main/master) or
manifest.defaultBranchin the Nextflow configuration will be used by default. - Set the Work directory location of the Nextflow work directory. The location associated with the compute environment will be selected by default.
- Enter the name(s) of each of the Nextflow Config profiles followed by the
Enterkey. See the Nextflow Config profiles documentation for more details. -
Enter any workflow parameters in YAML or JSON format. YAML example:
-
Select Launch to begin the pipeline execution.
Info
Nextflow workflows are simply Git repositories and can be changed to any public or private Git-hosting platform. See Git Integration in the Seqera Platform docs and Pipeline Sharing in the Nextflow docs for more details.
Note
The credentials associated with the compute environment must be able to access the work directory.
Info
In the configuration, the full path to a bucket must be specified with single quotes around strings and no quotes around booleans or numbers.
Tip
To create your own customized Nextflow Schema for your workflow, see the examples from the nf-core workflows that have adopted this approach. For example, eager and rnaseq.
For advanced settings options check out this page.
There is also community support available if you get into trouble, join the Nextflow Slack by following this link.
Summary
In this step you have learned:
- How to create an account and login into Seqera Platform
- How to configure your compute environment.
- How to add, customize, and launch a pipeline with Seqera Platform.
API
To learn more about using the Seqera Platform API, visit the API section in the documentation.
Workspaces and Organizations
Seqera Platform simplifies the development and execution of pipeline by providing a centralized interface for users and organizations.
Each user has a unique workspace where they can interact and manage all resources such as workflows, compute environments and credentials. Details of this can be found here.
Organizations can have multiple workspaces with customized access for specific organization members and collaborators.
Organization resources
You can create your own organization and participant workspace by following the docs at Seqera.
Seqera Platform allows the creation of multiple organizations, each of which can contain multiple workspaces with shared users and resources. This allows any organization to customize and organize the usage of resources while maintaining an access control layer for users associated with a workspace.
Organization users
Any user can be added or removed from a particular organization or a workspace and can be allocated a specific access role within that workspace.
The Teams feature provides a way for organizations to group various users and participants together into teams. For example, workflow-developers or analysts, and apply access control to all the users within this team collectively.
For further information, please refer to the User Management section.
Setting up a new organization
Organizations are the top-level structure and contain Workspaces, Members, Teams and Collaborators.
To create a new Organization:
- Click on the dropdown next to your name and select New organization to open the creation dialog.
-
On the dialog, fill in the fields as per your organization. The Name and Full name fields are compulsory.
Note
A valid name for the organization must follow a specific pattern. Please refer to the UI for further instructions.
-
The rest of the fields such as Description, Location, Website URL and Logo Url are optional.
-
Once the details are filled in, you can access the newly created organization using the organization’s page, which lists all of your organizations.
Note
It is possible to change the values of the optional fields either using the Edit option on the organization’s page or by using the Settings tab within the organization page, provided that you are the Owner of the organization.
Tip
A list of all the included Members, Teams and Collaborators can be found on the organization page.
Summary
In this step you have learned:
- How to create a new organization
- How to access the newly created organization
- How to change organization settings